Here we go with the prompt #14 until #20.

 Otamatone is bizzarre electronic musical instrument from Japan.


 A hard prompt. Outpost is defined as small military camp far away from the main camp. When playing real time strategy game, usually people will put cheap units like basic archer or warrior along with towers to scout or detect enemies' attack.


 The coral in my mind should have a lot of tiny branches. Such structure is usually represented using Miura fold. My idea is to make a branched structure, where each branch featured Miura fold. Think of Kamiya's lyrebird's tail but branched.


 I spent too much time upgrading the weedy seadragon and left behind this prompt. I can't think of something more interesting than a simple rocket, so this model is created. What I wanted was color changed tip and two appendages on the underside. Well at least one day I can teach kids this simple model to keep them entertained.
 Here we go with the prompt #14 until #20.
#14 Music: Otamatone


 |
| Source: vat19.com. |
I adopted diagonal symmetry because this model is long. The "neck" shouldn't be problem, so the design started from the "head". Two long flaps are needed for upper and lower jaw, and there should be smaller flaps on the upper jaw to make color changed eyes. An obvious solution is fish base. Therefore I put this fish base on lower right and fill the rest of the paper with big fish base and pleated structure.
Later I test folded it and came into conclusion that fish base for the head wasn't suitable. So I opened the lower portion of the fish base and started free folding. The corner is folded up not all the way to the top to expose little color change for eyes, as shown on right half of the CP. Then the new corners are folded up, then down, as shown on the left half of the CP. The remaining shaping creases aren't shown because they are just pleating the neck's base to make fret color change and narrowing. The tip of the jaws need to be sunk, otherwise the head will look like reptile.
I accidentally made this as action model. You can pinch the base of the head to make the jaw close and release to open.
Surprisingly I got positive response from the community. They liked it and some folded it.
 |
| Folded by Nkiyoshi. |
 |
| Folded by Noah. |
#15 Husky: Tank (Left 4 Dead)


Speaking of the prompt, "husky" is a narrow topic. We all would think about the dog breed. I wasn't in the mood to design color changed dog so I checked what exactly does husky mean. It means strong and bulky. It reminds me of a zombie from the game called Left 4 Dead which I played like 10 years ago.
 |
| Taken from Left 4 Dead Wiki. |
This model needs 2 really long flaps with branching tips to represent arm and fingers, and 2 smaller flaps for head and torso. I planned to graft the legs later. Now, 2 long flaps and 2 small flaps is again a good fit for fish base. The legs can also use smaller fish base. The plan was like:
 |
| Size proportion isn't final. |
I can fill the remaining space with pleated structures just like on my otamatone. The raw edges can be used for fingers. However the transition from this pleat to the legs can't use the same transition as otamatone because it reduced the legs' length.
 |
| Green circles show the current leg length, and the red areas show the expected leg length. |
The legs can be made longer by extending the Elias stretch on the boxpleated part and fill the hole with additional flap. This structure was discovered through free folding and I've used it before on greater bird of paradise.
With the arrangement finalized, I calculated the reference point before drawing the CP. The ratio of bigger : smaller fish base is \(2+2\sqrt{2} : \frac{4}{3}\sqrt{2}\). It's an ugly reference, but it actually allowed the boxpleated creases to align well with the fish bases.
Additional middle flaps created on the torso are distributed into smaller pleats to represent abs. The remaining paper on the corner was folded up to make color changed jeans.
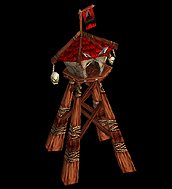
#16 Outpost: Orcish Tower (Warcraft III)


This prompt reminds me a lot of Warcraft III. I planned to make foot soldier from this game. The plan got scraped once those models ended up becoming a complicated boxpleated model. So I thought of creating this orcish tower.
 |
| Source: WoWWiki. |
It has a hut-like structure on top, supported by wooden pillars. Some of the supporting pillars formed 'x' figure. I used the following tree to represent the structure:

It is simply a bird base, where each long flaps got forked. On each forked flap, one of the branch will be used for main pillar, while the other two got lifted up to form the 'x' with the neighboring main pillars. We can use bird base with diagonal grafts for the forks and in the end it looks like Dr. Lang's tree frog. What's remaining are just thinning the structure through sink in-and-out. I could've gotten better shape if I sunk it even more, but as you might have read before, I don't like sink in-and-out.
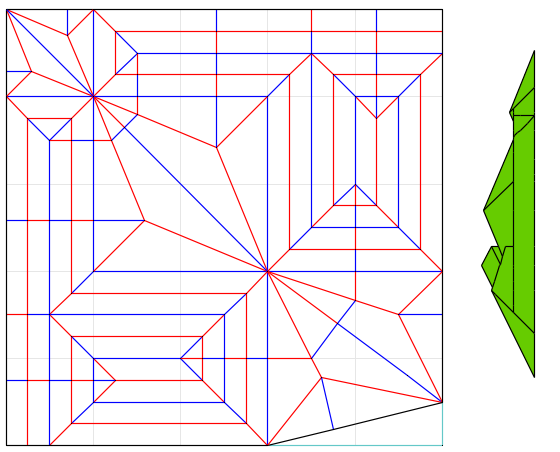
#17 Coral: Coral


Easiest solution is to use bird base. To make it more interesting, I skewed the central flap so that rivers are formed. This varied the length of each branch. Now each branch can be sunk in-and-out, and got Miura fold applied to it. By the way, the reference point for the middle flap's center is 4/7.
I found the concept of using 15 cm square kami to fold this unappealing. So I used leftover double tissue.


 Weedy seadragon is different species from the more well-known leafy sea dragon. This one has way less amount of appendages.
#18 Shoes: Talaria


Talaria is the footwear of Hermes, the Greek god of speed. I made this fully on boxpleated corner flap, thinking that one day I might design the full Hermes.
The structure is straightforward, just one long and widely pleated flap for wing, and some shorter flaps for the sandal's texture. Since the wing is the longest flap, I put it on the corner. It also made color change easy. The half grid pleat is the classic pleats commonly used on insect's abdomen.
#19 Dragon: Weedy Seadragon

I wanted to express two things on this creature:
- Broad body. A fish base that's folded in half is ideal to represent this.
- Small color changed eyes right after a long "snout". Again a fish base is ideal for this.
Therefore the design started with placing two fish bases in the main diagonals. I know that the tail will need some appendages coming out from it. So I added another fish base at the end.

The rest of the spaces are filled with flaps that will become the weedy appendages. It is very straightforward to use bird bases.

I made a test fold but realized that the weedy appendages and tail are too short. So I doubled the tail's fish base size. The bird bases are changed into boxpleated flaps because they are easy to fill the remaining spaces. Lastly I skewed the tail's fish base to get the smaller flaps get separated by river. The final CP is the one shown above.
There are still room of improvements. The tail and head is missing some weedy appendages. With those in minds, I made the version 1.1 as shown below. For the head, I split the fish base into two and fill the empty space with meandering pleat.


#20 Rocket: Cartoon Rocket


Remarks
I felt satisfied when producing the otamatone, tank, and seadragon. This satisfaction produced confidence to design more models. See you on the next post!
Check the previous challenge.
Comments
Post a Comment