You might have seen a pleated structure incorporated to a model. It is commonly used in insect for the abdomen, animal's ribs, or array of "spikes" on top of animal like crocodile.
I know how to construct it on boxpleated, but I wonder if the solution on non-boxpleating is generalizable. I remember that I've folded Kamiya's dragonfly and inoshishigami which uses that structure.
On inoshishigami, the rib pleat starts from single flap. This flap is squashed, then slid to top; as if now there's a river separating the flap. That step is repeated until that flap is split into 4 smaller unit flap, separated by rivers. However, in the last pleat Kamiya prepared squash on each edge so the final flap sliding can be performed. On dragonfly, the process is similar but the flap sliding is more prominent. Based on those models, along with warm shower, I started understand how it works.
Basically, we can split a 1-unit flap into N smaller flaps with length of 1/N unit, each separated by 1/N river. I will demonstrate how it is done below, just keep on reading.
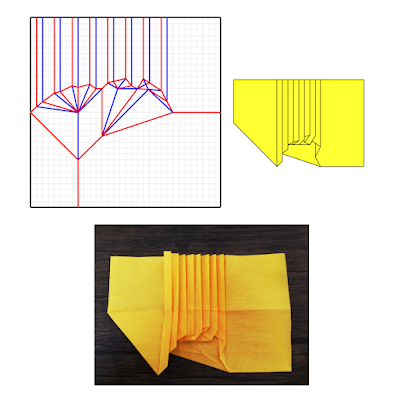
An opportunity came when Takuro Kashiwamura tweeted an interesting pleated structure. It is shared in Origami-dan, and I am interested to apply that technique. In the end I was able to achieve similar structure, but the right part is slightly different. Below is my version, based on Kashiwamura's structure.

That structure is kind of cursed if we need to fold it just from crease pattern. Imagine how on earth shall we find those angles. Luckily there's a sequence to do that. I made a picture diagram to make the structure above by using the sequence of: squash, pivot, and slide. Check it out here.
Try to follow the diagram and develop your intuition. I unfortunately don't have the necessary computational origami background to explain why does that work. However, let me know if you have question!
Comments
Post a Comment