


Bali myna (or Bali starling, or locally known as jalak Bali) is medium sized bird with mostly white plumage, and blue skin around eyes area. Its wings and tail are tipped with black feather. Male has crest composed of long feathers, and this is the sex that I designed. They can be found in Bali, but is currently critically endangered because of habitat loss and illegal pet trade.
Design
As usual let's breakdown the features:
- Beak, area around eyes, legs, and wing-tip and tail-tip has to be color changed.
- Each legs should have complete toes. Bonus point for long toes with nail at the tip.
- Completely white crest, possibly made from angled pleats.
- As much as possible, do not show color changed seam.
One tricky thing is all the color changes happen on the far end of the model. Wings, tail, legs, and beak are situated far away from each other. In order to be color changed, those parts better be put in the paper boundary. So this basic layout was born.

Somehow I want the base to look like this. The crest can be made by using curved pleats.

I came into conclusion that it is not possible to use the initial layout. The head need much more paper to color change eyes and beak, as well as making crest. So the layout is revised as following:
It is straightforward to just boxpleat it. There is an empty space in the middle that I don't know what to use it for. Perhaps I can just make a flap out of it and use it as belly. I did a test fold and it has potential.

About a week passed, and the conclusion I got from playing with my test fold was the need to swap the crest and eye/beak flap. It is easier to form eyes and beak from corner flap and bring it forward. There will be two beaks, one from each side that will meet in the middle. The eye part will have 2 flaps, one for the marking around it, and one for the eye. The crease pattern looks roughly like this:

The middle flap for belly doesn't really work. So I just absorb it for crest, which is now possible because the crest is in the middle. Maybe I can spread out the layers on the crest just like my markhor's mane.
 |
| Dark blue parts highlight the flow of river. |

I am fairly confident at this point, but it still bother me that I have to precrease grid to fold this. There might be a way to use 22.5 for this layout. For a week, whenever I was sitting with my eyes free (e.g: eating), I would stare at this CP. Finally I got a potential solution to approximate this layout with mostly 22.5 molecules. The bottom half is replaced with fish bases. The top half is still box pleated but it can be precreased without making grid.


The tiny flap produced on top of the kite shaped structure on to left might be usable to create the wing joint. Actually it is where the bird's fingers are. It is commonly seen in Quentin Trollip's bird models. Unfortunately here it was too high in the model and buried under the eyes.
 |
| The joint that I was referring to, which is where the bird's fingers are. |
The pleats to form eyes better be smaller than the pleats for beak. I randomly use a 22.5 reference and accidentally found a nice way to make the pleats size different. It uses similar structure in my bowhead whale's tail.

 |
| The wing fold is now in the right position. |
As for the legs, I am not too worried because there are many models out there that split a corner flap into 4 toes. E.g: Tetsuya Gotani's crane and Meng Weining's rooster. So it should be straightforward on larger paper. I gave it a try on 35 cm double tissue. It is white and blue, but the white is so weak to the point it is barely distinguishable.

The test fold has weird proportion. Beak and legs are too long, and the tail is too short. Fixing the beak is easy, just pleat it at the base to shorten it. For legs and tail, I got the idea to use a variant of "little bird" base. It is a nice intermediate step between fish base and bird base. This would shorten the leg flap, and lengthening wings and tail.
 |
| Top: little bird base. Bottom: sunken little bird base. |
The leg is first color changed by reverse fold. Then do point split to produce 4 Y molecules in the corner, which makes 4 toes with one of them slightly longer.

I also used that test fold to figure out eye and wing color change. Color changing the wingtip is actually easy. Just make a pleat near the end, unfold the edge layers and bring it to the front. In the final fold I changed the pleat with sink so it doesn't disturb the leg area. The eye part is not straightforward. I spent some time to free-fold until an acceptable approach is found.
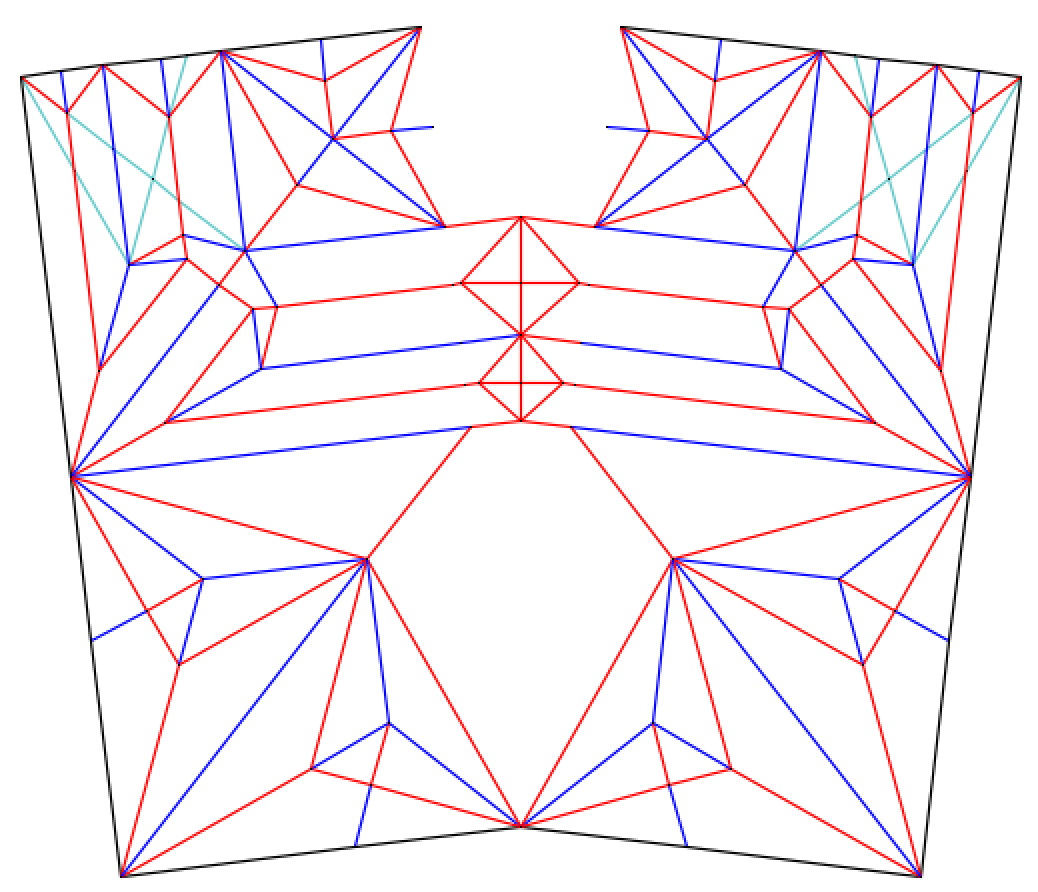
Putting it all together, here is the crease pattern. It is close to final one:

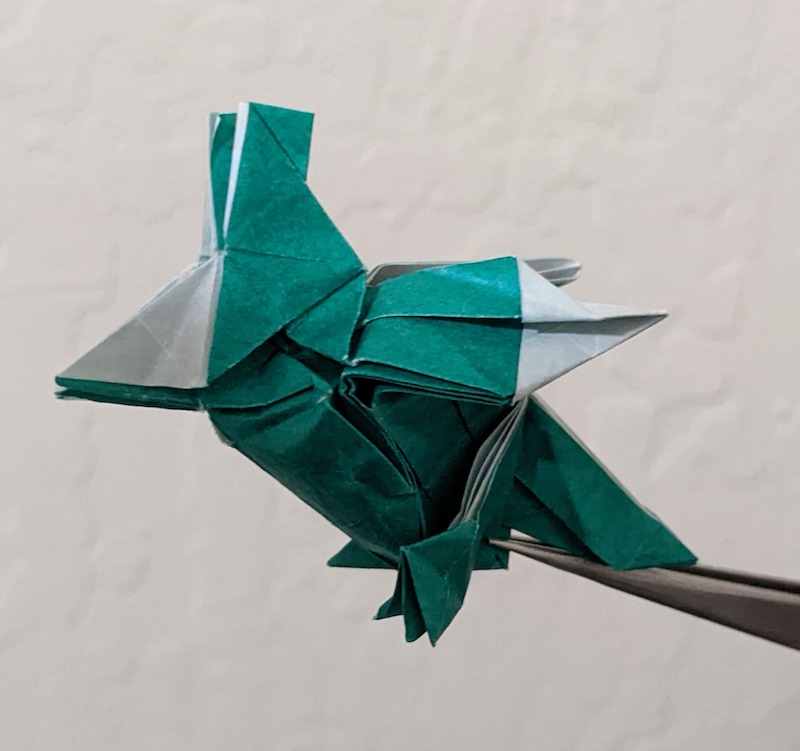
I made a 2nd test fold. It looks better and getting closer to final fold. The tail color change is achieved by folding the tip down, then unwrap the layers. Remember that earlier I mentioned that as much as possible there should not be visible color changed seam? The tail part is the only one that I couldn't fix.


I spent the next week to tweak the wing shaping and hope for random inspiration to improve it.
One improvisation is the crest. It bugs me that the crest flaps are all in the same length. Ideally the top should be short, then gradually getting longer towards bottom. I had this idea to tilt the layout so the pleats can be sloped:
 |
| Kite shaped area in the middle will produce gradually longer flap. |
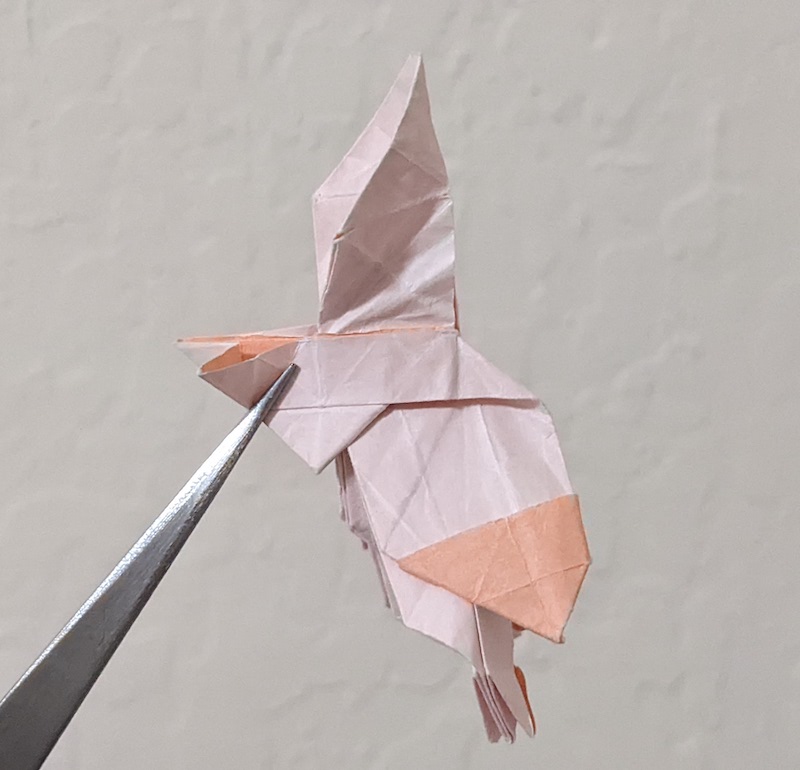
Obviously there's no need to tilt the entire crease pattern. I tried to find a way to just tilt the crest pleat part. After exploring it for a while, I couldn't make it work. It would always disrupt the other parts and produce waste of paper. In the end the I just do a sink before pleating the crest to produce slope, so the flaps produced will gradually become longer. This is the final version of the crease pattern.

There is still a waste of paper, which is the parts buried under the sink. It is also quite thick. However I think it's a good trade off between result, efficiency, and ease of folding.
An inspiration hit me one day before I made the final fold, to hide the color changed seam in the tail. It is done by doing "twist", so that part of paper became upside down. It is very similar with what I did on secretary bird. Here is how it looks like on the final fold.
 |
| Twisted tail to remove color changed seam. |
Fold
I had a lot of trouble in preparing the paper. Firstly I need a white and dark blue duo paper, and getting color separation for such combination is difficult. The test fold on double tissue had the white part just slightly brighter than the blue part. Second, I don't have the right shade of blue.
Few weeks ago I bought a white hanji (Korean paper) from http://mulberrypaperandmore.com. I think it is the right time to use it. Overlaying the paper on top of dark colored tissue shows that the white color remains brightly white, so as long as the tissue isn't bleeding, the resulting duo paper will have a good color separation. Thanks to this I don't need to deal with acrylic paint.
For the second issue, I bought some Spritz dark blue tissues. That brand is known for having tissue that doesn't bleed. Unfortunately the one I bought was bleeding, and fortunately I tested it first or else my fingers will turn to Smurf. In the end I just went ahead with my bright blue tissue.
 |
| Making tissue hanji. |
I heard a dreadful sound during precreasing: plastic-like noise when folding. I know this sound very well, and it means the tissue is splitting apart from the hanji somewhere in the middle. If you have experienced this you would know how disgusting it is to fold such paper. The actual case was worse, the tissue split apart in every fold. It must be that hanji absorb a lot of liquid during treatment, so the MC to stick with the tissue is barely touching both papers, causing weak bond between them. Screw it, I split the papers apart and retreat the hanji with new tissue, this time I put so much MC on top of the base tissue and furiously dampen the hanji beforehand with mist sprayer.
It worked and finally I can start folding. This paper is surprisingly thick. It felt like I was folding a triple tissue. This is an issue because the crest is thick and the beak had to traverse that thickness. So unfortunately the beak is shorter in my final fold. Still, this paper's durability is excellent. The crest is so thick yet it doesn't rip.
 |
| The unholy thickness. |
The hanji is marketed as 35 gsm. Paper weight doesn't define its thickness, but I was expecting it somewhat like 1.2 or 1.5x the thickness of tissue. Below is the comparison of double tissue and hanji tissue on 32 layered part.

Folding it was quite fun if I factor out the thickness problem. There is a nice sequence to fold the wings and do a sink to round the wing folds.
is there any tutorial to make this origami?
ReplyDeleteNo tutorial, only crease pattern available.
Delete