


 |
| Head part with more detailed creases. |
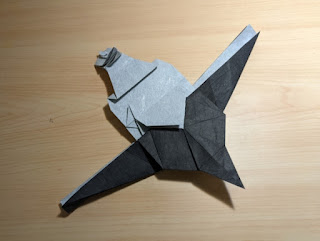
Secretarybird is a large bird of prey adapted for terrestrial lifestyle in Sub-Saharan Africa. It's like eagle but with long legs, used for stomping its prey.
This bird is endangered due to loss of grassland caused by road development and livestock's overgrazing.
I gave it accurate color change and beefy legs to help the model not being recognized as crane.
To express the long wings neatly folded behind, I pleated them so it is distinguishable from the tail feather.
Design
The features of secretarybird are:
- Many individual strands of crest feather. Most ends with black color.
- Long legs with black feathers covering the top half.
- Long wings folded behind, with black color along the edges.
- Long tail feather with mostly black color.
- The rest of the bird is white in color.
Those parts with color change means that they will occupy the paper boundary. A straightforward layout is bird base. One long flap for head, the other two for legs, and the remaining for wings and tail. The head part will need more paper to make crest. I planned to use border graft, which will also be used to make toes. This is a very common structure for making bird.
The not so straightforward part is how to make the crest and wings+tail. Let's start with the crest.
All of the crest feathers need to be put in the paper boundary so they can be color changed. This reminds me of Ancient Dragon (AD) by Satoshi Kamiya. AD has 8 horns, and all of them are edge flaps. It also has distinct upper and lower jaw. So maybe I can borrow the structure of AD for this design. Below is the basic structure of AD's head part.
 |
| Yellow, green, and blue shades represents river. |
I aimed to have just 6 crest feathers, so I simplified the structure. Unfortunately the result of my free folding with AD's structure gave me a rather draconic head.

A gap between the head and crest is needed to fix that. We can wrap all the crest feathers with river to make that gap.
 |
| Seven flaps to be used for crest, all enclosed by river. |
Filling the remaining space is quite problematic. I only need to allocate 2 flaps: the upper and lower beak. There are way too many available space. After staring at the current CP for a while, I got an idea to make two beak flaps enclosed by river and fill the remaining space by a separated meandering river.
 |
| Fully assigned packing for the top left area, which will be a border graft. Right side shows the tree for this packing. |
 |
| Fully assigned crease pattern of the first draft of the head. Try to identify the ridges that caused the river to meander. |
The test fold shows promising result.

I wished to have the crest feathers longer so it can be raised like this.
 |
| Image source: www.torontozoo.com |
Thinking about it for some time, I gave up. Making the crest longer means that more paper edge will be consumed and leaving large amount of unused space in the middle. Also the base of the feathers will meet at one point, and that would surely be thick as hell.
At this point I have to decide if this model will have seam on top or in the bottom (also known as "open back" and "open belly"). Given that this model has color change, it would be great to have the seam underneath. However I need the seam to be on top in the head area for crest color change. Insisting on having seam underneath will cause the head to be upside down.

There is a well known solution to this problem, commonly known as "neck twist" or simply just "twist". In Katsuta Kyohei's book, he called it "Brill's twist", after David Brill who developed that technique. The first time I heard neck twist, I thought it involves twisting the paper like wringing a wet cloth. Fortunately it is not. It is essentially a valley fold through all layers. Let's walk through an example.
Consider this simple grafted kite base. If you have never folded neck twist before, I strongly suggest to fold this and follow the walkthrough.
 |
| The ratio does not matter. Just eyeball it the graft size to be about half of the kite base's square. |
Starting on the wholly colored side up, perform valley fold on the left, and mountain fold on the right. The top part will automatically have fold along the main axis. This is like rabbit ear but twisted.

The result should look like this.

Turn over, and valley fold the entire right half and fit it under the layer on top.

And that is neck twist. As simple as that.

Let's examine what's going on. Notice that the seam that switched position from underneath to the top after the twist.
 |
| Left shows the initial state. The seam is all located on top (or bottom, depending on how the model is held). Right shows the final state. Bottom half of the seam is underneath, while the other half is on top. |
This elegant maneuver is useful for model with color changed facial feature and closed back. The drawback is it may not look good if there are many layers being twisted. Nevertheless I highly recommend folding Katsuta's fennec fox if you haven't folded it to see the power of this technique.
With working solution for the head, we can now move to the rear. I need to color change the tail feathers and back of the wings. Something like this if seen from top.

I thought of somehow forming a preliminary base (the step before petal fold on crane), and bring some raw edges to the top. A solution was found after spending some time free folding with bird base. This solution has a little issue that the leg part that will become thigh is locked. It can't be titled for posing the legs. For now perhaps that's fine.

Color changing the leg was done by usual layer unwrapping. Any ostrich or crane origami commonly use the same pattern. To color change once more on the lower portion of the leg, I used a series of reverse folds. The resulting right angle can be crimped to form leg joint. Actually it is not necessary to do reverse folds on every pleat. Just do one of it as shown on the final CP. It would be similar to closed sink.

As mentioned earlier I wanted to pleat the wings. I couldn't find a way to do it cleanly and resorted on pleat originating from thigh. At that time it looked decent, but looking back it was actually hideous :')

It's time to put them together. I randomly pick a graft ratio as shown on the last crease pattern.

The bad news is the neck is too long and everything else looks short. The good news is shortening the neck will make everything else looks longer. I thought to reduce the neck length by crimping or pleating, and realized it wasn't a good idea. The part with crimp or pleat will be unsightly thick.
There is a neat solution to this problem: sacrifice the neck length for more head features. I added one extra pair of crest feathers. This inevitably introduced empty space in the middle. I couldn't find any better solution but to fill it with filler flap. This filler flap is slid down to reduce thickness under the beak; that area shouldn't be too thick to perform neck twist nicely.
 |
| Green and blue shade shows river which will be folded on neck twist. The polygon enclosed by yellow lines is the filler pleat. Circle shows the flap length. |
The choice of meandering river is aimed to enable the crest river flowing without meandering. This is necessary because the plan is to sink each crest feather based on its angle bisector. Having a meander there will cause sinking to be annoying.
I wondered if the neck became too short. It was the case. Luckily we can make the neck longer by making the graft to bird base ratio smaller. That would also make the legs and tail longer. Based on my test fold and some photo editing, I decided that the neck to leg length ratio should be about 1 : 4.
 |
| How I determine the proportion. |
There was a little math involved here. Assuming the border graft is constant 6 unit wide, we could express the neck to leg length ratio as function of bird base's length. I won't write the formula here but in the end I found that the bird base should be 20 unit to achieve nearly 1 : 4 neck to leg ratio. It can be simplified that the border graft is 3 unit, and the bird base is 10 unit. This is how I ended up having this weird proportion that sums to 13.
I made another test fold and this one has much better proportion. The head part is shaped more by narrowing all flaps, using angle bisection and sink. Exposing the colored part for crest feather is done by swiveling the raw edge.

I spent the rest of the week tweaking this test fold to improve the wing pleats. Finally found a way to do that by mountain folding the edge.

This will create pleat-like structure that can be squashed and slid to make 2 pleats.

The paper in the bottom part are not locked, and the remaining wing pleats can be done by simply pleating them.
The next issue is leg positioning. I really want to have one leg tilted to the rear. I spent another few days to free fold it the test fold to the point that the paper became mushy and I had to make another test fold. In the end I found a way to do it as shown on the CP on the top. That would be the final CP of this model.
One final issue is leg thinning. If you folded this, you'll notice that the white part of the leg will have black part exposed in the front. Hiding that part by folding in half won't work because it will be visible on the other leg. A solution that will hide that black part from both sides of the legs is needed. In the end I made a narrow sink to hide it.
Material
After one year of avoiding black & white model, I can no longer escape. Black and white paper is notoriously difficult to prepare, especially for double tissue. The black color will overpower the white one, causing the white side to be become grey.
 |
| Pennant coralfish designed by Yoshimasa Tsuruta. See how grey the white tissue became. |
It's not always because of the black dye bleeding to the white tissue. I got my tissue from Blick and it doesn't bleed at all. I am guessing it's because the white tissue has little to no white dye; they are a little transparent. Overlaying dry white tissue on top of black one would already make the white tissue grey.
There has been many discussions on Origami-Dan about this problem. Easiest solution is to make triple tissue, like black - white - white. I couldn't afford to do that since this model is quite thick on the neck twist part and leg color change. Another solution is shared by Bodo. He suggested to have acrylic paint mixed with MC to be put in between the tissues.
After several trial and consultation with the folks on Bodo's paper server, I finally produced my first decent black and white tissue. It's made by laying MC, then white tissue, then MC+acrylic paint. Wait until dry, then put another MC, black tissue, and final MC. The acrylic paint will bleed through the bottom paper but it's all good since it's white paper. I applied the acrylic paint with roller. Try to keep the paper as least wet as possible to prevent the acrylic bleeding uncontrollably.
 |
| The final paper, with bottom edge folded up. Right side doesn't have acrylic paint in between and you can see how faded the whites are. |
Fold
I have done a lot of test folds to the point that I've memorized the sequence. So doing the final fold was easy. The paper's size is 38 cm. Going lower than 35 cm would make the crest part harder to fold.


 |
| Before neck twist. See that the head is upside down (more like backwards on this view). |
Using acrylic paint was a great idea. The color separation is even better than triple tissue. Below is the comparison among my folds with various black and white based tissues.

During photo shoot, I used wire to support the model. I usually leave support structure on my final post without editing it out. My friend later humorously pointed out that in this particular case it looks like the bird is shitting. I agree with that statement, so that's a lesson for me to think twice before finalizing the post :))

Comments
Post a Comment