


Babirusa is a species of swine endemic to island of Sulawesi in Indonesia, and its surrounding islands. They have two pairs of tusks, a pair emerging from lower jaw like common boar, and another pair from upper jaw that penetrate out from the top of its snout. Those tusks are curved backward, with the upper one to a greater extent. Poaching and habitat loss are the cause of their status as endangered animal.
Apart from long and color changed tusks, I want to express babirusa's torpedo-like body and deer-like legs.
Design
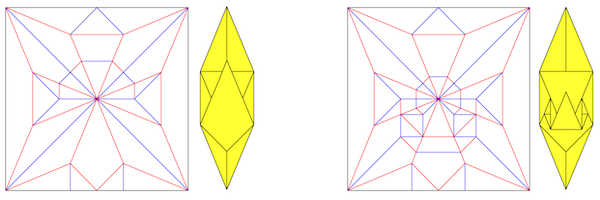
There is already a babirusa design by Quentin Trollip. I have his book and had folded it, so I tried to approach the design differently. It should still be a closed back model to prevent the paper's underside color disturbingly exposed.
The top tusks should emerge from the top of its snout, not from mouth. So I have the idea of making longer flap which will be pleated, so the color change starts from top of the snout. The lower tusk is similar, it should be a slightly longer flap so I can express lower jaw.
 |
| The thought process to make upper tusk. |
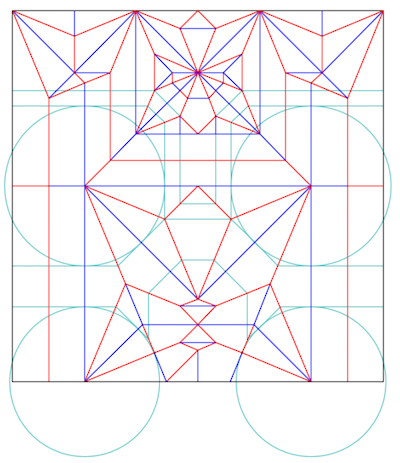
I sketched a plan for the base as following. All tusks should be in the paper boundary to allow easy color change.

As you can see, the lower jaws are expressed by 2 flaps. They will converge once the model is folded in half. This is a common strategy for closed back mammal models.
Then I made this layout for flap placements.

Book symmetry allows the easy creation of 4 flaps with uniform length in the edge of the paper, to be used for tusks. It also leave wide space for the body, and we can fold the legs as middle or edge flap. It might be counter intuitive why would anyone want to deal with middle flap, but I was thinking that making the legs thicker would allow the model to stand without external support. It is something I had wished my ibex to have. Actually this layout is commonly used for deer models, like Lang's elk/moose/deer, and Kazuki Fukuroi's deer. Un-ironic since babirusa literally means deer-pig (babi=pig, rusa=deer).
The first thing to do is to make upper tusks. The plan of pleating the flap midway to make color change works. I started with bird base and free folded it. These are just two of the longer flaps folded up. The snout is part of those two flaps.

Next I extended it to make lower tusks and jaw, as well as ears. I free folded on the paper and found a layout that might work. Upon drawing it on Orihime I realized that there won't be enough paper for legs. So this layout got abandoned.


The ears might be the most difficult thing to figure out. It needs to emerge from the middle of the paper. I spent few days experimenting and finally realized that the middle flap of the head's bird base isn't needed for snout, so maybe it can be used to make ears. After some free folding with sinks and unsinks, I found an acceptable solution. First sink all the edges to make the middle flap fully having 22.5 degree angles (no 45 degrees), then fold the middle flap in half, and unsink. There will be a wide edge created which can be shaped to make ears.
 |
| Forming edge for ears from bird base's middle flap. |
If we do that maneuver once more, this time towards the front, it will allow the creation of eyes.

Putting it together with tusks, this is how it looked like. The edges near the eyes can be used for tucking the top tusks edges. No glue was needed to hold it in place.

On the head test fold above, I used the other two flaps on bird base for lower tusks. Following the initial plan they need to be moved to the sides. The flap arrangements remains identical and the lower tusks formation can use the exact same sequence.
 |
Alright head is done, time to make the body. Since the other two flaps on bird base are not used, I would use them for forelimbs. They are too short, but luckily there is a pleat nearby that can be used to extend it. It works like a border graft. Well it looks too long, but I will convert some of the length for river between head and legs to make neck.

The empty space in the bottom mid will be filled with body and hind limbs. I can just free fold it. I found a way to use half bird base and Y molecules.

Notice that the Y molecules are overlapping. Overlapping molecules are actually possible; the collided part will just end up shorter than it should be. We can spread squash it so the model can be spread symmetrically.
There is a problem here. Forelimbs are way too long. Apparently the pleat to extend the forelimbs are too big. Making the pleat smaller would make the lower tusks flap shorter, but luckily there's a better way. I remember a skewed variation of this sunken sawhorse molecule I saw on Kaede Nakamura's striped dragonfly (finished model).
 |
| Notice that the right pleat became narrower. All angles are multiple of 22.5 degrees. |
Not only this makes the forelimbs shorter, it also makes the hind limbs longer because the Y molecule is larger. All the lines in the bottom intersect at regular places. I didn't plan it, it just happened to be that way thanks to the magical property of 22.5 degree system. Forelimbs are still slightly longer, but it can be fixed during shaping. Altering the forelimbs length will affect the tusks part and I don't want to deal with it.
There are excess paper at the tip of each limbs (the long trapezoids on left and right border). We could do sink in and out there to make pleats. I planned to use this pleat to make hooves and dewclaws. This design was ready for test fold.

The test fold shows that the proportion looks good. However the pleats at the tip of each limbs are too big to make hooves. They ended up looking like fingers. They are also too thick to be made for dewclaws so I abandoned that idea. Another interesting thing is I found a way to wrap around the layers on hind limbs to get more interesting thigh structure. Lastly I found a way to make lower tusks longer, which is what I showed on the final crease pattern.

The only thing to fix is the hooves. I reduced the number of pleat to just one, and it is much smaller.
It uses half of the 3rds as reference. To avoid unnecessary pleats I changed the trapezoid pleats with common 22.5 molecules.

Fold
I had the test fold done on 38 cm paper, and it was just alright. Going smaller is possible but I'd imagine smaller than 30 cm would make the upper tusks' thickness more severe. The final fold uses 36.5 cm, not because I want it but because of slight variance in my tissue's size. Here are some progress pictures.
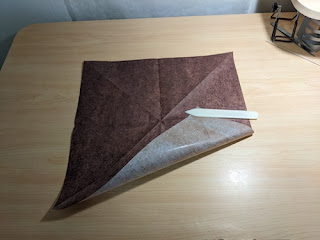 |
| Obligatory starting sheet picture. |
 |
| Precreasing. |
 |
| Collapsing from the head. |
 |
| Half body is collapsed. |
 |
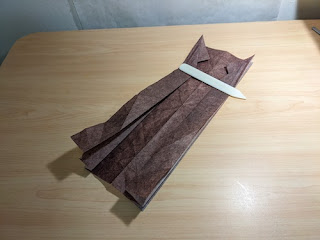
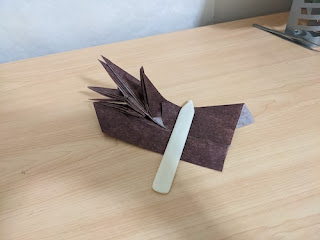
| Main parts done, just need to deal with the head part. |
 |
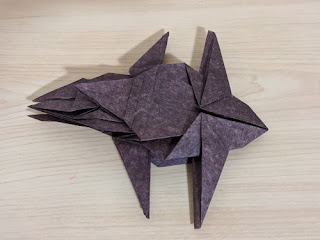
| Final base. |
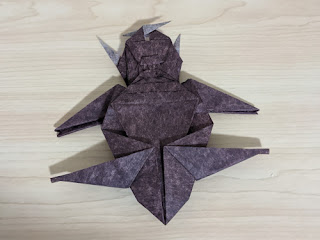
I am still not totally satisfied. The head part still have room of improvement, to express more curves of this animal. Possibly to make nostrils too. However that would be exercise for another day. This is the best I could do at the moment.
Comments
Post a Comment