


Ibex is a type of wild goat found on Eurasia and North/East Africa. Easily identifiable by its long curved horn full of ridges, which is what I'm trying to express here.
Nubian ibex is vulnerable to extinction due to competition with livestock and habitat loss. Ibex has been nearly extinct multiple times in the past because of hunting and unable to compete against livestock. The most recent extinction was Pyrenean ibex, in the year of 2000.
 |
| Image source: https://animals.sandiegozoo.org/animals/nubian-ibex |
I want to make my model to be instantly recognizable as an ibex, not a goat. Horn ridges are rather specific for ibex, so I tried to represent that with spike structure commonly used on insect legs.
Design
The thought of making ibex has been on my mind since 2017, about 4 years before this post is written. I want to produce longer horn than typical goat origami. Having not much experience, I made some prototypes that is still on my computer file system.
 |
| Version 0.0: top left is head area. Notice the forelimbs are shorter than hind limbs. |
 |
| Version 0.1: same length for limbs but many useless middle flaps. The ears, represented as two small touching circle on middle-top-left, in particular are buried by the horns. |
 |
| Version 0.2: horn became smaller with the thought that I can strip graft it later. Many of the tiling is wrong there. The design back in 2017 stopped here. |
Fast forward to 2020, I made another attempt. This time I want to represent the horn ridges. I had an idea to use boxpleated flap and spread squash it. There is a tiny flap that can be pulled out and raised perpendicular to the surface. This can be made to represent horn ridges.

 |
| Tiny flap raised to represent horn ridges. The sides are just released outermost layer to give the horn's thickness. |
But why not just pleat the whole flap? Two reasons:
- Pleated part can't be raised up (without mushing) to represent horn ridge. It's great for usual horn segmentation on horned animal, but not this one.
- It consumes lots of paper (see image below). Considering ibex's horn is even longer than its leg, a lot of paper is already dedicated to horn. Spending more just to shorten it by pleating is undesirable.
 |
| Top: using \(28 \times 28\) grid to create \(14\) unit long flap, then pleated to make segmented flap. Bottom: using \(20 \times 12\) grid to achieve same result, which is 67% less paper than the top. |
Of course the size of the pleat can be made smaller. The point is pleating the whole flap will consume larger amount of paper.
So I came up with this rough structure:
 |
| Circle just to show the length of each flap, not the actual packing. |
Now it's clear that this layout has some issues:
- Head flap is too long. Even after spending some for beard, it is still too long.
- Tail flap is too thick and too long.
- An extremely thick useless flap for chest. I don't actually need it, it's there just to fill the empty space.
However it wasn't the case at that time, and I proceeded to make the final fold with 30 cm Daisho's paper. In the end I realized those flaws and tossed away the model. No other picture that I can find apart from progress pictures.

Reader of this blog would know that the idea of using spread squash's tiny flap is reused for my bird of paradise model.
Now here I am, attempting this subject again on 2021. I realized that using normal boxpleated flap will produce horn ridges that are too sparsely spaced. To make them denser, we can use spike structure. One way to achieve it is to stretch one side of a flap, effectively cramming more paper on that side which can be spread-squashed into spikes.
 |
| Top: optimal 22.5 flap without excess paper. Middle: same flap with excess paper, allowing them to be squashed and producing 3 tiny flaps. Bottom: same flap with further stretch, producing 7 tiny flaps. Circle in all pictures show the length of the flap. |
I know this structure after seeing Brian Chan's leafy sea dragon. He called it "teardrop" shape and used it for leafy appendages instead of spikes. This teardrop shape perfectly fits my use case to make ridged horn. There is another way of creating spikes commonly used in boxpleated insects. I haven't studied how that works. Kota Imai used that structure a lot.
 |
| Ridged horn made by rabbit-earing the spike down. The final fold should have crimps to curve the horn. This 15 cm kami just can't handle it. |
Conceptually it looks simple, but difficulty in using this structure is how to handle the different pleat angle. Pleats that aren't vertical or horizontal will appear. A straightforward way to incorporate that is to simply replace the horn with teardrop shape on my latest CP. I used 22.5 as the slope since it's easy to draw in Orihime. The different pleat angle simply flow to the top of the paper.
 |
| Circle shows the flap size. Yellow part shows the boundary of the teardrop, no flap or river should be overlapping with it. Note that only the part that is stretched needs to be inside the paper. The rest can be outside like how normal corner flap behaves. |
The pleats coming towards bottom of the paper is normal vertical pleat. Filling the bottom part for body and limbs should be as easy as common boxpleating. However I don't know what to put on the empty space on top. That area will have dense pleats and putting the head there will result in skinny head. Level shifting there is possible but it looks hard, given how small the space is. I don't want to think through it and discarded this layout.
Next idea is to put both horns in the corner. This layout has nice property that all pleats that flow out of the teardrops are always vertical and horizontal. This is equivalent to my bird of paradise model layout, just adapted for teardrop packing.

I spent days trying to pack the body. Head+beard, neck, body, and tail should be put in the remaining symmetry line. They will occupy the main diagonal space in lower right section. Forelimbs and hind limbs can be put on the sides. There's an empty space on top left, just above the horns. I put point splitting there to make two smaller flap for ears.
 |
| The forelimbs will need to level shift a lot of pleats coming from the teardrop structure. |
Did a test fold and it sort of works but the head is too short. Making the head longer would mean the paper needs to be larger, and that adds the unused spaces between forelimb flap and body river. The forelimb is already middle flap and I don't want to fatten it to absorb the empty space. It would be too thick to shape.
If highest efficiency is aimed, I can disconnect the body's river from main diagonal, and swap the position of the limbs. The body river will be put between forelimbs and hind limbs. Technically this is the same as making hind limbs longer, and make it coming out from the shoulder.

This structure produces a base that looks like an octopus. There will be 5 flaps coming from the shoulder. Two shorter one become the forelimbs, two longer flaps will be hind limbs and we're supposed to leave a gap before folding it down. The remaining longer flap will be used for tail in the same way. In theory it works but I rejected this idea because it is weird and the model will require unorthodox gluing to make the "body" stay connected. I realized that despite the simplicity of packing the horns like that, packing the body is tricky because only half symmetry line is left to pack the animal's structure that lies on it.
Next idea is to put the horns on each paper corners. This has similar benefit that majority of the pleats coming out from the teardrop will be just horizontal & vertical. By having the main diagonal free from horns, I thought there will be more freedom to make the animal's body. I was motivated to do this since this is how Kamiya designed his deer and caribou, also Katsuta for his Irish elk. Their antlers are positioned on similar place.
 | |
| Head will be positioned on top left, and the large space on bottom left will be for body. |
The design starts with silver rectangle, or the shorter version with side length of \(2 : 1+\sqrt{2}\), for the animal's body + limbs. A river for neck is wrapped around forelimbs and flow to the edge of the paper. Then the teardrop shape can be put in the corner. I spent half a week prototyping and ended up with this nice structure.
 |
| Area highlighted by yellow line can have sink in and out to form pleats. Rivers drawn aren't entirely accurate but they demonstrate how the flaps are separated. |
I said nice because the parts that will become horns are independent. It can accommodate arbitrary amount of sink in and out and we'll get the horn ridges there. I have no idea how to fill the rest to make the head and resorted to free folding. That is when I realized a flaw in this layout: too much paper on the head area.
 |
| See how much paper for the head compared to the rest of the model. |
The amount of paper for head is also tied to the horn's size. Meaning that if I make the horn longer, more paper will appear for head area. Surely we can just compress that by sinking and stuff, but it gets really... really thick. I ditched this layout for that reason.
As usual, I got the next idea during a nap. What if I use the initial layout, break them in half vertically, and rotate each halves by 45 degree inwards? We'll get something like this:

It is true that the pleats coming out of each teardrop won't be vertical or horizontal. However if we rotate the paper by 45 degree, they will! We can perform diagonal boxpleating here.
 |
| This will be diagonal boxpleating with book symmetry. |
I made the horn to have 24 pleats in a hope to create up to 10 horn ridges (can't be 12 since some will be at the end points). It is surprisingly easy to pack the head, neck, body, and limbs. I set the neck and body to be 2 unit rivers, and all the remaining flaps has 4 units.
 |
| Red region shows left half, while blue is the other half. |
The boxpleated areas are replaced with bird base whenever possible. The hope is to get wider surface area for body and thighs. Also to relieve me from having to precrease grid since I'm still shivering from folding my cordyceps tarantula. Large level shifters are put right below the horns to absorb the pleat.
 |
| Horn pleats aren't drawn, just imagine sink in and out performed there. See next picture as reference. |
There are few short additional flaps. The one between forelimbs is unusable. One of the two on the bottom edge can be utilized for tail. So what do we do with the flap that was planned for tail? I found that it can be reverse-folded towards the body to make belly. Ibex has a rather stocky body.
Now there's one missing thing: the ear. After checking the circle/river happening in the CP, I found that I can snug the ear just under the horn. It will be a bit annoying to fold given that it lies on partial grid, and the reference is outside of the paper.
 |
| Tiny flap on the squash just under the horn on left & right sides shows the ear placement. |
Everything sounds good so far so I made a test fold. By the way I have this picture of all my test folds.
 |
| Test folds over the time, from right to left. |
Sadly the ear will be too short. It is buried under the horn. There's a workaround to make ears, which is using the large level shifter's triangle. The highest point on that rabbit ear can be used for ear.

I am fairly confident that this design has began to mature. As usual I will leave it alone for few more days before actually folding it. Who knows, maybe another one or two naps will give me random inspiration.
The next day I got an idea to avoid partial pleat. The idea is to change the slope to be non 22.5 degree. Optimal slope is found by connecting the last whole pleat in the edge towards middle-top point. This turns out to be having 3/8 as slope (3 vertical = 8 horizontal).
 |
| Arrow shows the last whole pleat that I want to make as starting point for the horn. Yellow line shows the slope of 3/8. Right half shows how the resulting crease pattern would look like. The pleats on top of the slope is not a pretty angle, but it doesn't matter since it flows to outside of the paper. |
No other idea came out for the next few days. I showed this CP on Origami Design Server and Bodo suggested to eliminate the large level shifter to simplify it. After I explained that I need it for ears, he pointed out that ears can be made under the horn. It is like what I did before and it didn't work. However now that the pleats are whole (no partials), I might be able to get longer ear flap. Trying it on my test fold, it works. So thanks to Bodo for suggesting that. The CP is now finalized and the same as what's on top of this post.
 |
| Test fold using 50 cm double tissue. The ear in the front is using level shifter's highest point while the other ear is using squash under the horn. |
I am satisfied with the overall structure. Now it's time to think about shaping. I've always hated shaping hooves so let's start from the legs. The hind limbs are corner flap, while the forelimbs are middle flap. So the hind limbs will be 1/4 thinner than forelimbs, causing the model to be difficult to stand on its own. Given that external support is inevitable, I thought to pose this model not in usual standing mode, but in headbutting mode. Ibex does it by briefly standing using hind limbs, then fall forward to headbutt with its horn and full body weight. This brief standing pose is what I am targeting. Using the test fold I doodled the leg positioning. The smaller flaps at the paper edge beside forelimbs are squashed to make shoulders.
Finally the head. I just pleat the tiny flap from squash fold to form eyes like Kamiya's ancient dragon. The beard's layers are spread like Lang's Alamo stallion.
Fold
Measured on Orihime, the horn pleat will be just 2.21% of the paper length. So if I start with 50 cm, each pleat will be 1.1 cm. That sounds great, so I might be able to go for smaller paper. However I noticed that the horn needs crimping to curve it. There are like 20+ layers on the base of the horn, so I better use the largest paper possible to dampen the thickness. In the end I used 50 cm double tissue. I used green since I don't have suitable color for ibex.
I precreased everything including the horn's squash. During my test fold I didn't precrease it and do the squash on the fly. That felt nice but it's difficult to get precise result. Collapse starts from hind limbs, then forelimbs, head, and finally horns.
 |
| Obligatory "single square" starting paper picture. |
 |
| Collapse after precreasing. |
 |
| Base done, except for ears. |
 |
| Spread squash and pulling out the small flap. |
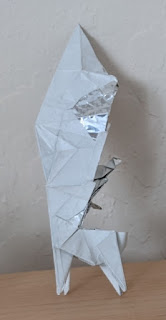
| Applying MC between the horn layers, so the they don't splay. |
 |
| Final picture before shaping. Somewhat looking like a praying mantis. |
Curving the horns at the base is still hard due to thickness. It didn't look as good as I wished it to be, and in the end I can only make 9 horn ridges (per horn). Still, I am satisfied with the result.
 |
| See the base of the horn on the right side? "Crimping" is essentially reduced to "bending" |
Bonus
Watch ibex fight here. Tone down the volume since the first impact is quite loud.
Comments
Post a Comment