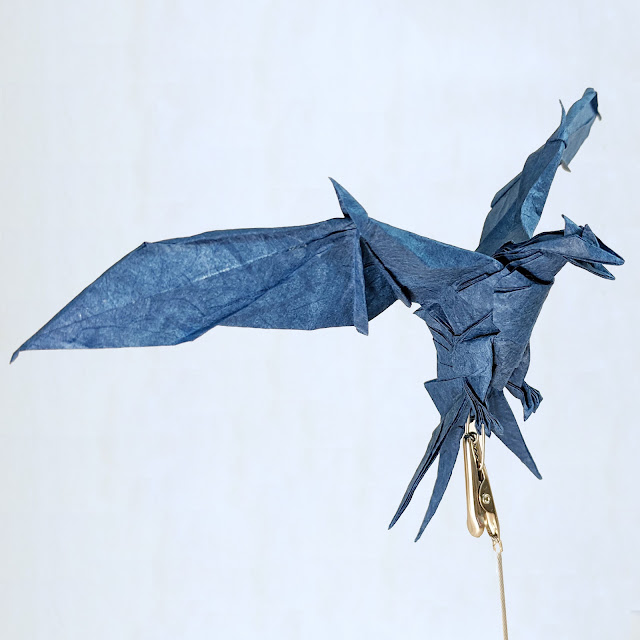
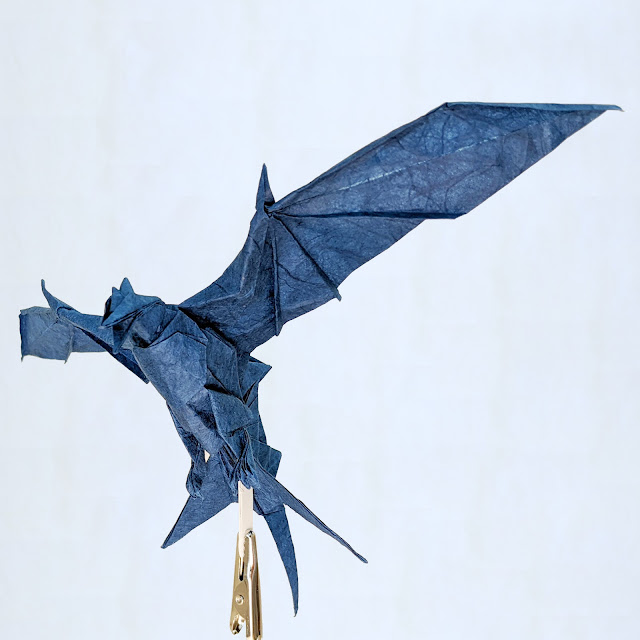
My submission for Origami Dan's April contest, whose theme was "dragon".
Concept
Famous designers have their own dragon:
- Satoshi Kamiya has Ancient Dragon. Arguably ryujin, bahamut, or alduin can be put here but those are taken from existing mythology or franchise
- Gen Hagiwara has Origin Dragon
- Hideo Komatsu has Gentle Dragon
- Chuya Miyamoto has his wyvern
- Shuki Kato has Western Dragon
- Kim Dong Hyeon has Temple Dragon
- ... and the list goes on
This contest is a perfect excuse to design my own dragon. My preference is wyvern-typed dragon, which has 4 limbs: a pair of wings and legs. The wings are modified hands with extremely long fingers and membrane in between just like bat.
I want to create dragon with aerial agility, so it shares features with agile birds like barn swallow and frigatebird. They have long wings and deeply forked tail feather. This dragon has no feather, so I gave it membrane at the base of the tail supported by spines.
This will be called "Swift Dragon".
Design
Wings and tail are going to consume tons of paper, so they must be put in the corner. Where do we put the head and legs then? Either the legs or the head need to be put as middle flap. This is somewhat difficult choice because dragon's head requires lots of paper for the long neck and horns. I prefer to tone down the horns and head features in favor of longer legs, so the head is chosen for middle flap.
Three corners for long flaps, one corner for two shorter flaps, and a middle for shorter flap. Am I looking at bird base with point split again? I may have used this structure too many times....
 |
| Upper left half is used for tail, and lower right half is used for legs |
Obviously the tail flaps are short. To push more paper for wings and tail, a diagonal strip graft is inserted. The bird base will be split into a larger half and smaller half. The smaller half will be used for head and legs. It is a simple structure and I just went ahead to test it out on 15 cm paper.
 |
| Highlighted area shows the graft. Small circle on bottom left is small flap to be used for the dragon's "thumb". |
 |
| The first test fold. |
It certainly have potential. There is one problem: the wings sprout from the dragon's butt. A quick but wasteful solution is to fold the wings up, then fold them down at the desired location.
 |
| Notice that legs (flap (c) and (d)) is in higher position than wings (river (g) and flap (h), (i)). This is fixed simply by lifting the wing river (g) before folding it down. |
I added a squash for aesthetic reason. Apparently this redirected the rivers, creating 2 separated rivers.
 |
| The squash caused river (g) and (f) to become shorter, and created new river (x) and (y). |
Another interesting thing is river (y) flows out of the paper and it is sticking to itself all the time, so it actually forms a flap. You can see that in my first test fold, there is a protruding accumulation of paper under the tip of the tweezers.
My test fold actually has a lot more sinks and the crease pattern is slightly more complicated:
 |
| Crease pattern so far, with more sinks as applied on test fold |
Notice that there is an ugly misalignment of hinges, in the form of narrow mountain-valley fold. We can make it disappear by using truly 22.5 reference to divide the strip graft instead of dividing it into 4 equal parts. That hinge misalignment is actually river (f).
 |
| Hinge misalignment disappeared after the strip graft is adjusted to use \(1 : \sqrt{2}\) reference. |
I need to give this dragon toes. The most straightforward solution is to add border graft. There are some problems with this:
- Unnecessarily skinny pleats are introduced along the dragon wings.
- An extra paper is added to unused flaps, especially the flap between the legs.
- The legs' length are not enlarged. So adding border graft just for creating toes is inefficient.
 |
| The added border graft is wasteful as only toes benefit from it. |
Back to the previous version, I paid attention to the flap created by river (y). So what if this river is redirected and wrapped around the legs to expose more paper at the tip of the legs?
 |
| Notice the part marked with "?" has more paper at the tip of flap, allowing the creation of toes. |
Specifically I am looking to form an isolated molecule which can take arbitrary amount of sinks, commonly used by pro 22.5 designers like Miyamoto Chuya and Yoo Tae Yong.
 |
| Common molecules for finger on 22.5 models, without grafting. |
Exploration like this is better performed on paper than crease pattern. I made a test fold from 25 cm double tissue and started free folding around that area. It is indeed possible to strip down the accumulated layers in the useless flap and assign it to the legs. The following picture focuses on the bottom half of the crease pattern.
 |
| Left: the result after releasing the accumulated layers. Middle: result after squashing the circled point on left picture. Right: forming toes from pleats. |
You may notice that there is a tiny squash near the top of the leg section. It's there so the pleats don't travel up to a winding region. This is intuitive to be done on paper.
 |
| Without the tiny squash, the pleats will travel up. |
All of this is done before the "aesthetic reason squash" is performed. The squash need to be reintroduced, otherwise the legs would be too short due to trapped layers. Adding the squash back is trickier because the river formed no longer flow out of the paper. This can be fixed by doing another squash elsewhere, effectively making the river looping back.
I tried to do it on the closest ridge but couldn't fine a nice way without mush. However, it is easy if the diamond squash is performed on the smaller pleat.
 |
| The squash is done on smaller part of the strip graft pleat. |
The creases are 11.25 instead of 22.5. Here is the solution for the 22.5 purist out there:
The next test fold was done on 40 cm double tissue. The head is too big but we will talk about it later. A more uncomfortable problem is on the legs. By using smaller diamond squash, the legs are not at the full length potential. It was only apparent when tested on larger paper.
 |
| Light blue: the current leg's length. Yellow: the longest potential length. |
I kept staring at the crease pattern and found a solution to go back to use the larger diamond squash using gusset-like structure. This was done on software instead of real paper. The drawback is there is no practical way to fold it apart from precrease and reassemble.
For the sake of satisfying curiosity, here is how the river ended up flowing. In reality it is not always possible to draw river, especially on non-axial model. However this one should give clear idea on what's happening.
Another test fold is done on 40 cm double tissue. I tried to make the head smaller by doing reverse fold for the head closer to the tip. This waste the paper since the lower jaw doesn't use its full length potential. The wasted paper could have been used for extra horns, or eyes, or maybe teeth.
We need the pleats where the mouth flaps are smaller. It is easy to just flip it around and make adjustments. The top part can have extra pleats for an extra horn.
 |
| Head test fold with two horns. |
That test fold wasn't wasted as I practiced the shaping there. Wing shaping is easy, just a classic pleats to make long fingers running down the wings. Legs are also easily done with multiple crimps and reverse folds. The tail was more of a challenge. It was totally free folded until a satisfactory result is achieved.
Fold
One final test fold was made with 25 cm paper to get ready for the final fold, which would use 30 cm unryu. I prefer to use larger paper, like 35 cm but I really like the dark blue color of this handmade unryu bought on nearby bookstore. It matches the color of barn swallow which serves as the inspiration. This handmade unryu is slightly thicker than the machine made unryu I used for my condor. It still feels soft, but the paper is sturdier.
 |
| Paper for final fold |
 |
| The final test fold |
The hardest part of finishing this model was to take picture. It was difficult to find good angle which can highlight its legs and tail membrane. I had to make sure the wings width and length are properly shown.


Comments
Post a Comment