Design
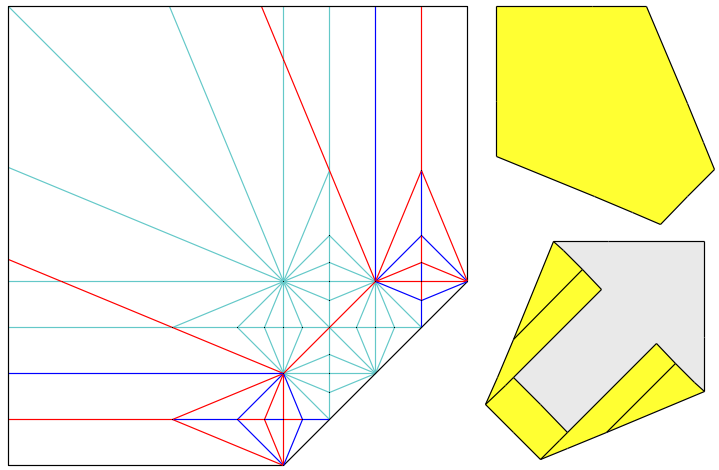
Here is the crease pattern for initial version. It's basically a blintzed traditional base. We'll be adding grafts around the legs for toes.
Adding strip graft is easy. We can easily get some digits on each legs depending on how many pleats are on the graft. For example, here's how we get 3 digits on the hand:
Double the amount of pleats on the graft, and we'll get 6 digits. Two marked flaps will be interlocked on top of each other.
Frog has 4 fingers and 5 toes. If I go with this approach, the hand will have 2 extra digits and the leg will have 1 extra. Those can be hidden, but doing so won't be interesting. I tried to at least find a way so the hand will have correct amount of fingers.
I stared at my CP on Orihime, and got an idea of forming a square area that can accommodate arbitrary amount of sink in and out. This way I can make 6 pleats to get 4 toes. By the way the formula for getting N toes is to have 2N-2 pleats.
Finding creases that would be flat foldable around that square was done in trial and error. Firstly it is natural to have the 22.5 trapezoid to transition to the grafts.
The rest is found with the aid of Orihime's flat foldability tool.
Well surprisingly that works well. In a glace it looks like the hand is made longer given that there's no waste of paper. However on closer look it isn't the case. There is a winding river that filled the space.
 |
For the legs, I couldn't find an elegant solution that yield just 5 toes. Using similar method with the hand will produce much shorter toes. In the end I just go with the "hiding extra toe" approach.
Next thing to decide is how big should the graft be. Bigger graft means longer finger and shorter limbs. I randomly pick a reference that is easy to use, which is the river part of a rectangle with silver ratio. It is a right balance of ease of locating and proportion.
The last part is the head. On the first version, I didn't do much other than curving the head to form eyes. For this upgrade I wanted a color changed eyes. Through some free folding that is restricted to 22.5 angles, I found a way to form protruding color changed eyes. Arguably they are too small though, and from the front this frog looks like Kermit.
Fold
I used 35 cm Japanese foil for test fold. The folding process didn't use any concrete sequence. I just precrease everything except the hinges and collapse all at once but the toes. It is important to precrease the finger's pleats because once collapsed, the hand part will be quite thick.
For the final fold I used 37 cm double tissue. The fun part was to form the toes. First, precrease the 22.5 folds on the toes as shown on the right part of final CP. Then collapse partially like this:
Next crease through all layers to form the 3 fingers in the middle. The excess paper shown below can be rabbit-eared like half bird base and tucked under the 3 fingers in the middle. Once done you'll get 5 independent toes (in other words, without interlocked flaps). The middle one will be very thick, like 1.5x of the thickness of normal middle flap but it shouldn't be a big deal.
The base is quite wide. It can be used to make the frog's body 3D with some crimps. Do it as last step after the spots are done. I hid the crimps under the flap used for spots.
Here are some progress pictures.
 |
| Obligatory initial square paper picture. |
 |
| Base collapsed. |
 |
| The underside. Pull the middle flap under the mouth to make volume, and use the other middle flap in the bottom to better lock body's position. |
Remarks
There are still some room of improvements for this model. The seam on the back isn't aesthetically pleasing. I have to somehow use the underside of current model as the back, and pull the spots to this area. Another thing is the toes should have different length. Those would be exercise for another day.


Comments
Post a Comment