Origami Peacock Spider


I was inspired to design this when I watched this cute video: https://www.youtube.com/watch?v=HYFQQB9vqPw
The spider looks funny and rather, cute.

Downloads

Crease pattern can be downloaded here.

Design

I wasn't worried about the legs since they should be straightforward. So I started with the abdomen.

The abdomen needs to be color-changed, and then color-changed once more to draw the pattern. I was inspired to use windmill base, since some people in Origami-dan like to use it for designing 2D color-changed models. Windmill base is versatile because it has 4 flaps which fully cover perimeter of paper, and as we know color-change is normally done on perimeter.
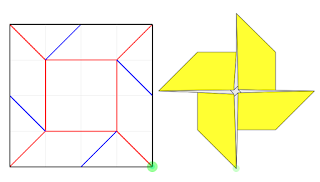
Windmill base. See the grey part on folded model shows the paper perimeter.


Now I just need to make similar flaps that is from paper perimeter. This is easily done on box pleating with array of 1 unit flaps:
Five 1-unit flaps that is usable for color change.

Finally to make the pattern, I strip grafted the flaps to add extra perimeter. It is shown on the CP.

To get the top strip, do a reverse fold and slightly lift up the corner.

For the "circle" and dot, start from reverse-folded shape like before, then improvise.

And finally the bottom strip is just fold up.
Just be sure to fold it accurately! The one in picture is very sloppy and just for demonstration purpose.

For the eyes, there's a way to make seamless rhombuses.


The main challenge of this model is accurate and symmetric fold. My dexterity and fine control is still low, so the result isn't as good as I imagined. Some time in the future I'll refold it after I grind with more models. 

Comments

Popular posts from this blog

Origami Condor v1.2

Got an idea to improve the design while commuting. Change log from previous version : Extra row of feathers (coverts) Curved the secondary feathers' terminal edge Slots on primary feathers are now monotonically decreasing in size Here you can see the comparison: Before vs after

The Foolproof Way to Divide Paper Into N'ths

We all have been there... asking how to divide paper into 14ths or 15ths and occasionally got the answer of "just make 16 grid and cut it". Another scenario is being terrified with prime number division like 13ths or 17ths. In reality it's not that difficult. This post will share how to make such division just inside your head so you can start folding right away. I promise it won't require any arcane maths.

Warped and Wrinkled Paper Curse

After starting using Carboxy Methylcellulose (CMC), I began to wonder if my setup wasn't right. The problem was my double tissue would always peel itself when drying. There will be high pitched popping sound from the paper every now and then. Finally it would be completely off the surface. Whereas on every tutorial I saw, the paper will still stick to the surface and we have to peel it off. The bad part is the paper will be warped; it's not flat. It is difficult to fold a straight line on paper like this. Imagine precreasing a grid or locating references when your fold can be bent due to the paper's bump. I have theory on why the warp happened. Before going to that, it is important to know that: When a paper is wet, it expands. When it dries, it will return to the original size. However it will keep its shape when it is wet, meaning that if it is bent when wet, it will retain that bend when dried.  When my paper dried partially, that region will shrink. This created differe