After folding Cordyceps, I had an idea to fold an ant carrying something. Then I remember there are types of ants that cut leaves and bring it back to nest. Those are called leafcutter ants.
I am always interested in composite origami model, especially with color change. There are extra challenges in allocating paper for different parts and decide how to join them.
Design
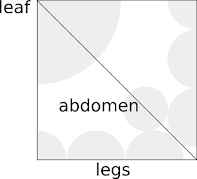
To express the ant's relative strength, I decided to make the leaf as big as possible. It is clear that this leaf will be a long flap formed in the corner.
Next is the ant, which is naturally put in the opposite corner. Insect like this is typically designed with legs using corner/edge flap, and abdomen as middle flap. Therefore I tried doing that.
However this made it hard to fill the ant's head, and I realized that the abdomen can just use the corner.
For the front part of the ant, I need a pair of antennae, and mandibles to pinch on the leaf. Those flaps need to be separated from the legs by river. It was difficult to get the correct length proportions though, which I expected the length of mandibles to be shorter than head, and head is shorter than antennae. The best I can came up with is extending the legs' central point to the top, creating total of 5 shorter flaps with equal length. Hopefully they can be shaped into head, 2 antennae, and 2 mandibles.
I improvised the remaining crease to connect the ant's front part and leaf, using box-pleat style and spread sink. Here is the final crease pattern.
 |
| (I started to enjoy drawing rivers) |
I gave it a test fold using 15 cm x 15 cm common origami paper. The base collapsed... and sort of fulfill my vision.
I doubt if it can be shaped properly. After trying to narrow the legs just by half, the ant-part became too thick to fold. However, it looked more ant-like, so my doubt were partially erased.
The next problem is the thickness. Even though I can use double tissue paper, I had bad experience on folding model where a river spans along the paper edge. On the base, all the "river part" of the axial polygons which this river cross before the symmetry line will stack on top of each other.
I used the remains of the double tissue and tried to fold as many layer as possible. The maximum amount of layers I can get is 48 layers. More than that, the thickness will prevent any further crease to be made unless I have bigger paper.
 |
| Insect legs, with 48 layers of double tissue |
Now I knew the limit... there should be no more than 48 layers in the final model. If I use the following narrowing strategy, there will be 46 layers in the ant's "neck". It is close, but we would never knew how good it will end up if we didn't try.
Fold
Alright, I grabbed my first successful double tissue with Methyl Cellulose which is 37.5 cm x 37.5 cm and start to fold it. Once the base is done, it took me 3 days of 30 minutes folding to shape the ant. Folding double tissue is harder than tissue foil, since the wet paper expands and caused the model to be unstable. I had to pinch it with paper binder or cloth drying pins, wait until it dries, and continue shaping other parts. The result is shown on the picture at the start of this post.
Remark
In the end, the ant's neck is fine. However the head was the problem. It's thicker, and heavier. Due to large weight differences between head and legs, the model is unable to stand on its own and I had to use memo holder
Overall, it was satisfying. We can also change the leaf into something else, as long as it can be shaped from the corner flap. Maybe a seed, toadstool, or scavenged dead insect body part.


Comments
Post a Comment